Quantcast
Channel: pololu – Hackaday
Viewing all 18 articles
Browse latest View live

The concepts behind robotic maze solving

$
0
0

[Patrick McCabe's] latest offering is a well-built maze-solving bot. This take on the competitive past-time is a little more approachable for your common mortal than the micro-bot speed maze solving we’ve seen. Don’t miss seeing the methodical process play out in the clips below the fold.

The playing field that [Patrick's] robot is navigating is made up of a electrical-tape track on a white background. The two-inch tall double-decker bot is every economical. It uses an RBBB Arduino board to read an optical reflectance sensor array made by Pololu, then it drives a couple of geared motors using an L293D h-bridge breakout board. But we already know that [Patrick's] a talented robot builder, this time around we’re happy to see his in-depth discussion of how to program a robot to solve a maze. In it he covers all of the different situations your robot might face and how to deal with them. Once you’ve dug through all of the concepts, dust off that bot you’ve got lying in the corner and start writing some new firmware.


Filed under: robots hacks

Pololu compatible relay driver

$
0
0

[Bart] built a couple dozen Pololu compatible relay drivers.

If you have a Reprap, you’re probably familiar with the Pololu stepper motor driver. These tiny pieces of kit provide stepper motor control for Gen 6, RAMPS, or Sanguinololu Reprap electronics. There’s a small problem with all these boards, though; there’s no way to control any high-power devices from these boards except for stepper motors. Controlling a spindle for a home-built CNC router would be great, but apart from attaching a Dremel to your x-axis, you’re just about out of luck.

[Bart]‘s relay driver takes the step and direction inputs from the stock Pololu stepper driver and connects each of those to a MOSFET. From there, a relay can be hooked up to the driver to control the spindle for a router, or a whole bunch of fans for a homebrew laser cutter.

The schematic and Gerber files are up on [Bart]‘s webzone. The part count is very low, and the entire board could easily be built on a piece of perfboard. Check out the demo on the other side of the jump.


Filed under: hardware

Insanely kludgy pen plotter actually works

$
0
0

This pen plotter, held together with structural epoxy, is an amazing piece of engineering, and almost as impressive as a bridge made entirely out of Bondo.

[Brian] at the Rochester, NY hackerspace Interlock needed to build something for the BarCamp geek “unconference.” To lure BarCamp attendees over to the Interlock table, they needed a small tabletop device with whirring motors that was able to make some decent swag. Hacking together a pen plotter sounded like the perfect project.

The mechanics of the build were scavenged from old printers and scanners. [Brian] decided to use pin-feed card stock, so the take-up wheels from an old dot matrix printer was sacrificed as well. This paper feed mechanism serves as the Y axis, and the X axis rides above the paper on precision rods. The pen holder is supported by a tiny solenoid.

Things start getting crazy at the software level. grbl was loaded onto an Arduino with a stepper driver shield, and vector text drawings were printed. After a bit of live-action hackery, [Brian] figured out how to plot captured webcam images. OpenCV captures and does a trace outline. This is converted to vectors with autotrace, and from EPS to HPGL by pstoedit. A Python script then cleans up the HPGL and converts it to G code and sends it to the printer. Confused? So are we, so just check out the video of the plotter in action after the break.


Filed under: hardware

10 Meter long moving light show is mesmerizing

$
0
0

light-show

[Marcus] was recently commissioned to put together the electronics for a slick 10 meter long LED installation at the Hsinchu Biomedical Science Park Exhibition Center in Taiwan. While you might assume that he was asked to construct a large LED matrix, this project is a little bit different from what you probably expected.

The display is actually a long light tunnel made up of 30 moving triangles suspended from the ceiling. The triangle movement is governed by 60 separate stepper motors, while the lighting is provided by 30 HL1606 RGB LED strips he picked up from Adafruit. The display’s logic is handled completely by an XMOS controller, which is beefy enough to handle controlling all of the stepper motors and the LEDs simultaneously.

After he hand assembled all of the motor driver boards and tested things in his workshop, the whole lot was shipped over to Taiwan for assembly by the on-site crew. After a bit of troubleshooting, they were able to get things working properly, and the display looks great as you can see from the image above.

[Marcus] says that he doesn’t have video of the display in action just yet, though he will update his post whenever he does.

[Thanks, Paul]


Filed under: led hacks

Bang-banging your way to a perfect cake

$
0
0

bang-bang-oven-control

[Rob Spanton’s] house is equipped with a rather cheap oven, which was discovered while his roommate tried using it to bake part of a wedding cake. If someone took a shower during the baking process, a large portion of unit’s gas pressure was diverted to the boiler, causing the oven to shut off completely. This is obviously not a good situation for baking cakes, so the housemates decided to construct a makeshift controller to keep temperatures in line.

They started by installing a pulley on the oven’s knob, which is connected to a small motor via a long rubber belt. The other end of the belt connects to a small motor, which is controlled by a Pololu 18v7 motor controller. A K-type thermocouple monitors the oven’s temp, feeding the data through a MAX6675 converter to (presumably) [Rob's] computer.

Since they were in a bit of a time crunch, [Rob] and his roommate [Johannes] decided the best way to keep the oven at a steady temperature was via bang-bang control. While you might imagine that cranking the gas knob between its minimum and maximum settings repeatedly wouldn’t be the ideal way to go about things, their solution worked pretty well. The cake came out perfectly, and the maximum temperature swing throughout the entire baking process was only 11.5°C – which is pretty reasonable considering the setup.


Filed under: cooking hacks, home hacks, news

Robot can barely move with so much hardware strapped to it

$
0
0

web-server-robot

We think that [Andrej Škraba] needs to start looking for a beefier motor platform. This little robot has so much hardware strapped to it the motors can barely keep up. But with a little help it can make its way around the house, and it takes a whole lot of connectivity and computing power along for the ride.

The white stick on the top is a single-board computer. The MK802 Mini sports an A10 processor and up to a gig of ram. Just below that is a USB hub which is sitting on top of a USB battery pack. This powers the computer and gives him the ability to plug in more than one USB device. The robot chassis is from Pololu. It uses an Arduino and a motor shield for locomotion, with commands pushed to it via USB.

This setup makes programming very easy. Here [Andrej] has a keyboard and HDMI monitor plugged in to do a little work. When not coding it can be disconnected and driven over the network. He makes this happen using an Apache server on the MK802 and node.js. See a demo of the system in the clip after the break.


Filed under: robots hacks

GRBL compatible Arduino CNC shield

$
0
0

arduino-cnc-shield

By the time you get to the point in a home CNC build where you’re adding control electronics you may be ready for the simplest means to an end possible. In that case, grab your Arduino and heat up that etching solution to make your own GRBL compatible shield.

This familiar footprint manages to contain everything you need for a three-axis machine. The purple boards slotted into the pairs of SIL headers are Pololu Stepper motor drivers. Going this route makes replacing a burnt out chip as easy as plugging in a new module. The terminal block in the center feeds the higher voltage rail necessary for driving the motors. The DIL header on the right breaks out all of the connections to the limiting switches (two for each axis), spindle and coolant control, as well as three buttons for pause, resume, and abort. There’s even a header for SPI making it easier to add  custom hardware if necessary.

This is a dual-layer board which may not be ideal for your own fabrication process. [Bert Kruger] posted his Gerber files for download if you want to put in a small run with OSH Park or a similar service.


Filed under: Arduino Hacks, cnc hacks

The Stepper Driver Driver

$
0
0

KONICA MINOLTA DIGITAL CAMERA

The Stepstick and Pololu motor drivers are the heart of just about every Reprap electronics board, but they can go bad. The usual way of testing these things is to rig up a microcontroller on a breadboard, grab some cables, and wire something up. [Ken]‘s Easy Stepper Motor Controller is a much simpler solution to the problem of testing these drivers and could, with a bit of practice, be constructed on a single-sided homebrew PCB.

The Easy Stepper Motor Controller is a very simple board with connections to a motor, a power supply, and headers for a single Pololu or Stepstick motor driver. Two buttons and a pot control the rotation of the motor with the help of an ATtiny10, and jumpers for up to 16x microstepping are right there on the board.

There’s a video after the break showing what this stepper motor driver driver can do. It’s not much, but if you’re just testing a driver, it’s all you need.


Filed under: 3d Printer hacks, tool hacks

Flex Sensing for a DIY Data Glove

$
0
0

cyber

[Cyber] has been testing out intuitive input methods for virtual reality experiences that immerse the user further into the virtual world than archaic devices like a keyboard or mouse would allow. One of his biggest interests so far was the idea of a data glove that interacts with an Arduino Uno to interface with a PC. Since commercial products are yet to exist on a readily available level, [Cyber] decided to build his own.

He started out with a tiny inertial measurement unit called a Pololu MinIMU-9 v2 that tracks orientation of the 3-axis gyro and accelerometer. The USB interface was soldered into place connecting the wires to an Arduino Uno. From there, he hooked up a flex sensor from Spectra Symbol (which were supposedly used in the original Nintendo Power Gloves) and demoed the project by tracking the movement of one of his fingers. As the finger bent, the output printed on the serial monitor changed.

[Cyber] still needs to mount a glove on this system and construct a proper positional tracking method so that physical movement will be mirrored in a simulation.

[Cyber's] day job has had him busy these last few months, which has forced the project into a temporary hold. Recently though, [Cyber] has been an active member and an influence in the local Orange County VR scene helping to build a nice development culture, so we’re hoping to see more updates from him soon.

To view what he has done up to this point, click the link at the top of the page, and check out the video after the break:


Filed under: Virtual Reality

Defcon Side Trip: Pololu And Robots

$
0
0

PololuDuring our trip out to Vegas for Defcon, we were lucky enough to catch up with a few of the companies that should be of interest to Hackaday readers. One of the companies based out of the area is Pololu, makers and purveyors of fine electronics and robots. In an incredible bit of lucky scheduling, LV Bots, the Las Vegas area robot builders club, was having an event the same weekend we were there. A maze challenge, no less, where builders would compete to build the best robot and write the best code to get a pile of motors and electronics through a line-following maze in the fastest amount of time.

The Bots

The LV Bots events are held in the same building as Pololu, and unsurprisingly there were quite a few Pololu employees making a go at taking the stuff they developed and getting it to run through a maze. At least one bot was based on the Zumo kit, and a few based on the 3pi platform. Interestingly, the Raspberry Pi Model B+ was the brains of quite a few robots; not extremely surprising, but evidence that the LV Bots people take their line-following mazes seriously and are constantly improving their builds.

Each robot and builder ‘team’ was given three runs. For each team, the first run is basically dedicated to mapping the entire maze. A carefully programmed algorithm tries to send the robot around the entire maze, storing all the intersections in memory. For the second and third runs, the bot should – ideally – make it to the end in a very short amount of time. This is the ideal situation and was only representative of one team for that weekend’s event.

The worst case scenario is a bot that doesn’t quite have the proper mapping algorithm down. For example:

If, however, a robot can figure out all the nodes in the line following map, the second and third runs can go by pretty quick:

The folks at LV Bots put together a recap of the entire competition as well:

Pololu

Although I did arrive a bit after normal working hours, [Ryan] and [Kevin] were kind enough to take me around their shop for a small tour of the joint. It’s more or less what you would expect: one giant room with pick and place machines, giant ovens, solder paste dispensers, enough equipment for all the testing and rework, and a giant wall of filled with all their products. One of the more interesting pieces of equipment was a soldering robot. Yes, as in a robot with a soldering iron. Here are the pics:

Solderbot3 Solderbot2 Solderbot1

Being after hours, the machines were not running. [Kevin] did send me a video of the manufacturing process of their A-Star 32U4 Micro, shown below:

In addition to their huge manufacturing room, the guys took me up to their dev lab where they come up with the design of all their products. Lego abound, surprisingly in already built configuration. I’ll let the picture galleries speak for themselves, shown below.


The Bots

PacBot DSC_0030 LV Bots DSC_0007 DSC_0023 Blinky DSC_0004 The maze Blinky again RaspiBotsB DSC_0005 DSC_0003 Setting up for a run DSC_0009 DSC_0008

Pololu

The 'wall of samples' "The" Pololu Thousands of dollars in pogo pins DSC_0055 DSC_0053 DSC_0054 Shop floor Hundreds of steppers DSC_0041 DSC_0056 Truly, important stuff happens in the design lab
Filed under: hardware, Interviews

Halloween Hack Night at Pololu

$
0
0

dollCloseup

Have some servos and an Arduino lying around? It isn’t too late to get your freaky on! Last night, tech enthusiasts of Las Vegas gathered at Pololu Robotics to show off their hacks for a Halloween flavored edition of their bi-monthly robot club. These projects created by those in the community as well as the Pololu engineers themselves are fun and have a relatively short list of materials. So, if the examples below give you some inspiration, this is permission to Macgyver something together before your big Halloween party tonight…

roboFingers
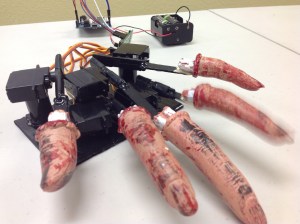
Impatient Severed Fingers – [Amanda] came up with a cute use for some mini servos and a zombie hand prop. The five severed fingers were attached to one end of a plastic rod. The other end was mounted to each of five servos which were laid out in the appropriate hand shape and attached to a fixed base. An Arduino running a basic sweep sketch animated the motors at slightly staggered intervals, creating a nice rolling effect. Even with the moving parts exposed this prop would be awesome to have on display, or set the ambiance with its continuous tapping…

deltaSpector
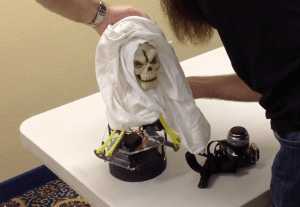
Angry Spectral Delta – [Nathan Bryant] made an actual costume for his delta robot from Robot Army. By attaching a small plastic skull to the end effector and draping a tattered piece of fabric over the rest of the mechanism he effectively transformed the delta into a little ghost with a sassy personality. The head swiftly bobbed about, all while staying parallel to the table… until it intermittently came unhinged and hung limply, which was a nice added effect!


exorcismBaby
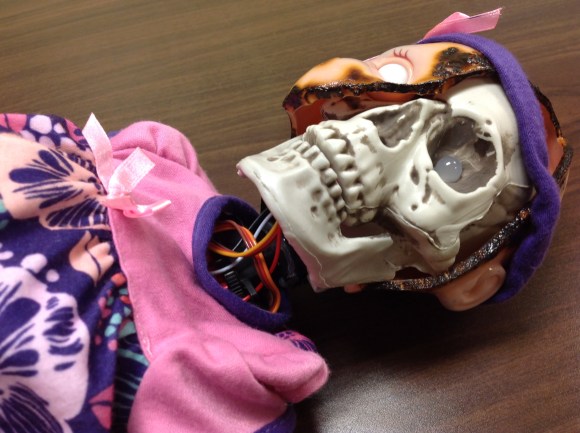
Robotic Exorcism Baby – This doll could turn its half skeleton, half baby face 180 degrees and then laugh at your fear. By attaching two servo motors together, [Jeremy] was able to create a pan and tilt mechanism which acted as the baby’s contorting neck and chattering jaw. The micro controller sending commands to the motors was hidden modestly under her dress.


shadowBox
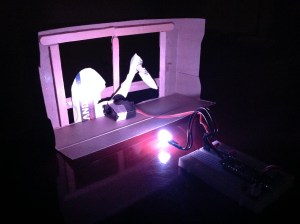
Stabby Animated Cardboard Shadowbox - Among the animatronic devices seen at the event was a shadowbox made by [Brandon] hidden in a dark conference room nearby. When one happened to walk past the seemingly unoccupied space, they’d glimpse the silhouette of an arm stabbing downward with a knife through a windowsill. Being lured in for further investigation you’d find that the shadow was being cast by some colored LEDs through a charmingly simple device. A cutout made from recycled card stock was attached to a single servo. This whole mechanism itself rocked back and forth slightly as the motor moved, which wasn’t intentional but added some realism to the motion of the stabby arm.

There were many interesting projects present last night ranging from remote-controlled skeletal arms to other reactive devices ready to deliver a scare. If you’re interested in knowing more, those made by the Pololu crew are documented on their blog. Since video does these projects better justice, you can check out a compilation of clips here:


Filed under: robots hacks

LVBots CES Open House: Tabletop Challenge and Clothes Bot

$
0
0

LVBots, a club for robot building enthusiasts in Las Vegas, held an open house the week of CES. This was the only trip [Sophi] and I took away from the conference halls of The Strip and it was a blast! The group holds meetings twice a month in a space provided by Pololu — a well-known robotics and electronics manufacturer headquartered just south of McCarran International Airport.

[Claire] demonstrating robotic closet demo and app The mechanized racks of the automated closet Line-following robot demonstration Sumo robots about to rumble

Before the formal part of the gathering started there were several builds being shown off. [Claire] and [Brian] recently participated in an AT&T sponsored hackathon. Their creation is a robotic closet. The system involves moving racks of clothing which are tracked by a smartphone app. Interesting features discussed for the software include monitoring when each garment was last worn, last washed, and if it is appropriate for current weather conditions. Dig into the code in their repo.

In other parts of the room a pair of line-following robots did their thing, and a couple of sumo-bots competed to push each other out of the ring. A large group was gathered around the projector watching videos of robots of all types, brainstorming about the difficult parts, how they were overcome, and how these methods may be applied to their own build. I can attest that hanging with a group of people who are trying to cue up the most amazing robot demonstrations makes for amazing viewing!

As the organized part of the meeting began I was delighted to hear about a standing challenge from the LVbots group. The Tabletop challenge has multiple phases that serve to encourage builders to start modestly and then iterate to achieve new goals:

Phase 0: bring a robot to LVBots
Phase 1: travel back and forth without falling off
Phase 2: find an object and push it off
Phase 3: push object into a goal

[Nathan Bryant] and robot DSC_0395 [Joe Carson] and robot DSC_0389

[Nathan Bryant] was one of the two robot builders trying out the challenge on this night. He built this hexapod from balsa wood and three servo motors and was testing Phase 1. The bot includes a sensor dangling out in front of the robot to detect then the table surface is no long below. At that point it backs up a few steps, turns in place, and proceeds in the opposite direction. [Nathan] mentions that he worked out all the movements in a spreadsheet and that future firmware upgrades will dramatically increase the speed at which the bot moves. We love the audible cadence of the bot which is easily observed in the video above. At one point a leg dangles over the edge and it looks like [Nathan] pushed the bot back but I don’t remember him actually touching it so I’m calling this a trick of camera angle.

One phase further in the Tabletop Challenge is [Joe Carson]. He exhibited a wheeled robot he’s been working on that includes a gripper arm on the front. The robot looks around the table for a predefined color, in this case provided by a highlighting marker. When found the bot approaches, grips, and then proceeds to move the marker over the void where it is dropped out of existence; at least from the robot’s point of view.


Filed under: cons, robots hacks

EddiePlus, the Edison based balancing robot

$
0
0

[Renee] dropped a tip to let us know about EddiePlus, her balancing robot creation. As its name might imply, EddiePlus is controlled by an Intel Edison processor. More specifically, [Renee] is using several of Sparkfun’s Edison Blocks to create Eddie’s brain. EddiePlus’ body is 3D printed, while his movement comes from two Pololu DC motors with wheels and encoders. The full build instructions are available as a PDF from [Renee’s] Google drive.

Eddie is able to balance and drive around on two wheels, much like a Segway. Sensor data for balance comes from Sparkfun’s LSM9DS0 based Inertial Measurement Unit (IMU) block. In this new “plus” version of Eddie, [Renee] has added encoders to the robot’s wheels. This makes it easier for him to adapt to changing loads – such as pumping iron (or banana plugs as the case may be). The encoders also help with varying terrain, as [Renee] demonstrates by tilting a board as Eddie drives on it. Eddie’s code is written in C, and available on Github.  Controlling Eddie is as easy as sending simple commands via UDP.

As you might imagine, the Intel Edison still has plenty of cycles left over after computing Eddie’s balance. [Renee] uses some of these with a webcam based teleoperation mode.

Click past the break to see Eddie in action!


Filed under: robots hacks

Robot Control Ties RC Receiver to Motor Controller

$
0
0

[Andrey Nechypurenko] has posted the second part of his robotics ground vehicle design guide. In his first post [Andrey] detailed the mechanical design decisions he faced. [Andrey] now begins covering the electrical components, starting with manual control using a standard radio control system. To accomplish this an RC system was used with an MD22 h-bridge driver and a picoUPS.

The MD22 is a neat motor control board which can take the PWM signals from the radio controller and use this to drive the DC motors. Optionally it can also use an I2C interface, giving a nice migration path to integrate with a microcontroller. Until that happens this can’t really be called a robot — its more of an RC vehicle. But the iterative design and build process he’s using is a good one!

The picoUPS provides on-board battery charging. Due to its UPS heritage it also allows the vehicle to be powered from an external supply, which has proved useful during development. Finally, a 5v regulator was required to supply the on-board digital logic. [Andrey] wanted a quick drop in solution with a budget large enough to allow for future expansion and went with the Pololu D15V35F5S3 which can supply 3.5 amps in a small and easy to use module.

After breadboarding the system [Andrey] fabricated a PCB to integrate all the components. The next step is to add sensors and and embedded computer to the platform.


Filed under: hardware, robots hacks

Smart Sumo Seeks Central Security

$
0
0

[David] over at Pololu programmed a mini-sumo robot, Zumo Red, with some extra smarts.

The basic rules of sumo robotics is exactly like human sumo – push your competitor out of the ring. [David]’s robot is special because it not only detects the competition border but measures the robot’s angle to the perimeter circle. Knowing the angle, [David]’s robot can turn and run for the center of the arena, the safest location. Once safe it can attack competitors from a symbolic high-ground. Unfortunately, the robot was a light weight in an already low weight class competition. It failed to push any competitors out of the ring and did not fare well in face-to-face battles. 0J6807.550

[David]’s bot uses a three LED line sensor, pretty common today for line following, to detect the boundary. As the ‘bot is moving an outer sensor will detect the border. It continues to drive forward until the middle sensor gets a hit. That provides the measurements need to calculate the angle. Neat and simple! Knowing the angle, the robot scoots to the center to plan its next attack.

[David’s] made the code for his bot’s brain, an Arduino compatible ATmega32U4, available so it will be interesting to see if the competition picks up on this trick.

Zumo Red meets Sumo Necko and a few more competitors in the video after the break.


Filed under: robots hacks

Technically A Hack. Still Questionable. Remote Control Food.

$
0
0

We thought we were going to read an article about, perhaps, a quadcopter that could fetch beer, or donuts. What we got was more along the lines of a donut dragging itself across the floor, rendering it pitiful and advisibly indigestible.

Sometimes people joke about not wanting to get in mind of a crazy person. We understand. While we could certainly follow [Michael Kohn]’s logic, the motivation was alien. Either way, in a rare turn of events there was not a single Arduino to be seen; just reverse engineering, unique solutions, and even a custom board. This is what some of you have been asking for… we think.

The brain of the questionable contraption is a TI MSP430G2231 and a tiny forward only motor driver circuit. The MSP waits for a signal from a hacked IR remote control from a cheap RC car. It then turns those into the appropriate motor control signals which go to some of those nice tiny metal gearboxes.

There were, naturally, a lot of technical issues in mounting the electronics to the food that, well… they didn’t need to be solved, but they were solved. For example, masking tape apparently does not stick well to green peppers, so toothpicks must be employed to pin the tape in place. Hopefully knowledge like this is scheduled for the nightly wipe while we sleep, but we’ll probably hold onto  it till we die, unlike expensive piano lessons.

In the end we had a good laugh, and the idea is so dumb it will probably be an educational Kickstarter next week. Video after the break.


Filed under: robots hacks

A Wii U That Is Both Computer And Console.

$
0
0

Legendary sudomod forum user [banjokazooie] has once again demonstrated their prowess in Wii U console modification — this time by transforming it into a powerhouse portable computer!

We loved [banjokazooie]’s RetroPie Wii U mod, and happy to see them back again with this build.  What’s in this thing this time around? Buckle up ’cause it’s a ride: an Intel M5 processor core M on their Compute Stick, 4GBs RAM, a 64GB solid-state drive, a 2K LCD touchscreen, Bluetooth, WiFi, a 128GB SD card slot, two 3.7V 4000 mAh batteries, a Pololu 5V,6A step-down voltage regulator, a Teensy 2.0++ dev board, a battery protection PCB, a USB DAC sound card, stereo amp, a USB hub for everything to plug into, and a TP5100 battery charging board. Check it out!

It runs Windows 10 and Cemu — a Wii U emulator — so virtually none of the console’s original functionality is lost in the process! The home button cycles through the joysticks’ coloured LEDs, and battery monitoring software safely shuts it down once the battery reaches critical — which takes about two hours when it’s being put through its paces. The LCD might seem like overkill, but it’s only 2.5mm thick, leaving enough space for the rest of the electronics while also having a more efficient power consumption.

Impressive as this is, it’s not the first time we’ve seen a console turned into a computer.

[Thanks for the tip, Amazing Skeleton!]


Filed under: computer hacks, nintendo wii hacks, slider

See This Slick RC Strandbeest Zip Around

$
0
0
Bevel gears used to mount motors vertically.

Theo Jansen’s Strandbeest design is a favorite and for good reason; the gliding gait is mesmerizing and this RC version by [tosjduenfs] is wonderful to behold. Back in 2015 the project first appeared on Thingiverse, and was quietly updated last year with a zip file containing the full assembly details.

All Strandbeest projects — especially steerable ones — are notable because building one is never a matter of simply scaling parts up or down. For one thing, the classic Strandbeest design doesn’t provide any means of steering. Also, while motorizing the system is simple in concept it’s less so in practice; there’s no obvious or convenient spot to actually mount a motor in a Strandbeest. In this project bevel gears are used to mount the motors vertically in a central area, and the left and right sides are driven independently like a tank. A motor driver that accepts RC signals allows the use of an off the shelf RC transmitter and receiver to control the unit. There is a wonderful video of the machine zipping around smoothly, embedded below.

One of the shortcomings of a Strandbeest is that it requires fairly even ground. The legs don’t lift very high, which limits it to flat terrain. That limitation didn’t stop the 13-foot rideable Tin Spider, but one alternative is the Klann Linkage used by Project Octo, a robotic platform intended for rough terrain.

Viewing all 18 articles
Browse latest View live


<script src="https://jsc.adskeeper.com/r/s/rssing.com.1596347.js" async> </script>